Paper-Based Work System
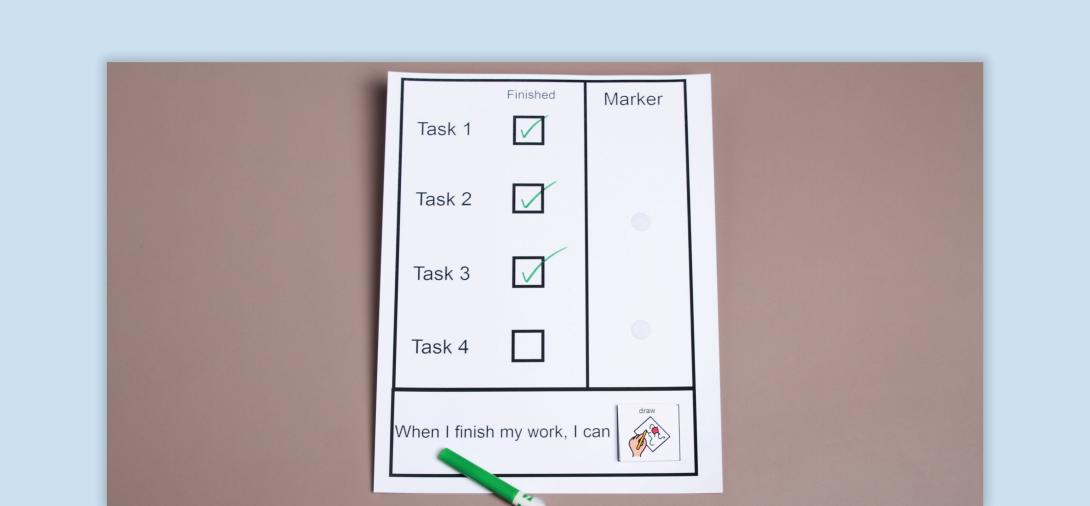
A Paper-Based Work System is a structured, visual system that helps students understand what work needs to be completed, how much work is required, when they are finished, and what to do next. This system promotes independent work completion, reduces reliance on adult prompts, and provides clear expectations for students who benefit from visual organization.
When to Use:
- To Foster Independent Work Skills - Help students complete tasks without constant adult prompting.
- For Fluency, Maintenance, or Generalization - Designed for students to practice mastered skills with minimal guidance.
- To Support Task Completion & Transitions - Provides a clear structure for beginning, completing, and transitioning between activities.
- For Use in Special & General Education Classrooms - Easily adaptable for various academic settings and skill levels.
- To Reduce Anxiety & Increase Predictability - Clarifies work expectations for students who may struggle with unstructured tasks.
How to Use:
- Introduce the Paper-Based Work System - Explain, “This is your work system. It helps you know what to do, how much to do and when you’re finished.” Show the START and FINISHED containers and the checklist.
- Model the Process Step-by-Step - Demonstrate taking the first task, completing it, checking it off, and placing it in the FINISHED container. Repeat for all tasks until reaching the “What to Do Next” activity.
- Provide Guided Practice with Prompts - Use verbal, visual, or physical prompts as needed. Gradually fade prompts to encourage independence.
- Reinforce Correct Use of the System - Praise students for completing tasks in order and following the system correctly. For example, “Great job finishing your work and moving to your next activity!”
- Fade Support & Build Independence - Over time, reduce adult guidance and reinforcement. Encourage students to self-monitor their progress using checklists.
Tips:
- Ensure Tasks are Mastered - Work should focus on fluency, maintenance, or generalization, not new learning.
- Use Behavioral Momentum - Start with the easiest or shortest task to help the student build momentum.
- Adjust Task Length & Difficulty - Modify the number of tasks based on student needs to avoid overwhelm.
- Encourage Self-Checking - Use checklists or self-monitoring tools to help students track their own progress.
- Ensure Materials Are Organized - Use stacking trays, accordion folders, or labeled bins.
- Lamination for Reuse - Laminate task checklists, instructions and reusable worksheets for durability.
Variations:
- Alternative Work Area Setups -
- Accordion folders with numbered sections for each task.
- Stacking trays labeled START, WORK IN PROGRESS, and FINISHED.
- Individual task folders for portability.
- Customizable Academic Tasks -
- Math fluency practice (e.g., solving 5 problems before checking off).
- Reading comprehension (e.g., read a passage, answer questions, check off when done).
- Younger or Non-Writing Students -
- Velcro picture checklists instead of written checklists.
- Color-coded bins for sorting tasks instead of using a checklist.
Related Courses

Autism
Antecedent-Based Intervention
Learn how to modify the environment to decrease interfering behavior and increase engagement.
View Course

Autism
Visual Supports
Discover the power of visual supports for supporting students with ASD. Learn about implementation steps, skills, and resources to enhance independence.
View Course