(upbeat music) - Hey y'all, it's Ayo here. Let's talk about how magical first-thens are. Really, they're better than jeans passes. That they are.
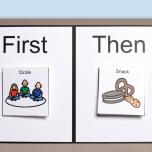
Making an individual schedule for a student with complex access needs is a common support to address motivation, transition, and behaviors, as well as build soft skills like time management and organization. All this with a very simple visual tool. A first then can come with two spaces, three spaces, or even more. Making it a first then or a first, next, then or even a first, next, then, last.
In all of these situations, the visual is telling us exactly what we are doing right now. It tells us what's coming up next and that information really helps students who are easily distracted or have a hard time transitioning or who work for tangibles and need to be reminded what they're working for. Having such an effective way to clarify expectations and focus student attention is part of why a first then is such a valuable visual. First then boards can come with picture supports.
They can use written words or even other visuals. This first then actually uses color coded stickers the teacher places on an activity. That way a student knows which task they're supposed to be doing in which order. So you'll choose a format that works best for you and your students.
Once you decide on how many spaces and how many you'll display, what way you'll display the information, and how long you want a student to work, it's time to get started. Now, just remember some students have a destruction point that might be several minutes, it might be just a handful of seconds. When you're working with a student who has a shorter attention span, sometimes it's helpful to make the transition between activity and reward a lot shorter. So getting to the praise and the reward for the student more frequently as you move back and forth between first and then or between the preferred and the non-preferred task, you'll really work to build some stamina.
All of this is why a first then is a powerhouse in terms of schedule visuals. Alright, so when it comes to actually using a first then, you're gonna follow four simple steps. First, you're gonna introduce the visual to the student. Next, you're gonna point to the icon and say first work or whatever the first task is, then choice or whatever the second task is.
So in this situation, we would say first work, then choice. Help the student as they begin, so that they know exactly what's needed here. Then when the first task is done, point to it and say work is finished and remove the task. Here's where it's great to have a container or someplace to put the finished task, so that it's visually removed and no longer available on the board.
Then you're gonna point to the next task and say, now task two, or whatever that is here, choice. So let's run that through really quick. Work is finished. Now it's choice.
Finally, be sure to start this next task immediately without any breaks in between. It's essential to the process that there's a connection between the first and second thing without any delays or ancillary activities tucked in between. It's essential to the process, so make sure that you do it. So just to recap one more time, let's see the entire sequence in action.
Time to work. First work, then choice. Finished. Work is finished. Now it's choice. Good job.
You can see in the example the done box really did help to have a basket or bin or space to put the finished task and remove it from the visual field. It's really reinforcing kind of like when you cross something off your to-do list. So having a place to put this is really helpful. Even if the place that you decide to put it is just attached to the backside of your first then.
It's an important tip to kind of know how to manage the pieces in order for you to be most successful. Another important tip is not moving the then to the first position when a student completes it. You can remove them, but don't actually adjust them or move them over. It creates kind of this endless loop of tasks that never ends feeling and you definitely don't want that because it will lead to negative behaviors, increased anxiety, and some frustration.
So pull them off, put them away, or erase them as you go, depending on the format that you're using as a general best practice. Finally, the last important tip here is to place the preferred task, or the preferred item, in the last position. This is what's motivating the student to complete a non-preferred task or a less preferred activity like work, right? So when we put that on the first, the non-preferred activity, we wanna make sure that we're backing that up with something that the student actually wants to do or a preferred task or activity.
This is what keeps this functioning as a very powerful motivator and makes the cycle much easier for your student to complete. Once you start using all of these fantastic visual schedules in the classroom, you'll see it supports students with complex access needs so much to build independence, to minimize behaviors, to reduce anxiety, and to help you build a positive classroom climate. I'm Ayo Jones here reminding you to stay strong and teach on. (upbeat music)